Master Git tools - Effective Programmer pt. 2
Welcome to the Effective Programmer series where I am writing about strategies and tools I use to increase productivity in my everyday work.
I gave a wider introduction to the series in the first part where I wrote about taking notes, I encourage you to read it.
- Taking notes for productivity
- Master Git tools
The cool thing about Git is that it’s easy to start with. Almost everyone uses it but less people think how to optimize the Git usage? In the end all of your code is stored there, I can’t imagine a serious project without repository. It means that learning the quirks and features of all of the Git tools could be important factor for effective work.
We’ll discover the importance of writing a good commit messages and how we could help ourselves by using message templates. Then we’ll go through topics like resolving conflicts, using Hooks, saving keystrokes with aliases and navigation through history.
I hesitated if I should also write about integrating continous integration with our repository but I decided that it’s too broad topic to also include it there. I’ve already wrote a little bit about optimizing CI here if you are interested.
Writing Clear and Concise Commit Messages
Why commit messages are important?
We do have Git Diff to find out what changes were done, but the commit message is the only place where it’s possible to find out why the changes are there. Usually understanding why something happened in the past, getting the context, is our biggest challenge.
Understanding the past is not the only reason to write a good commit message:
- It speeds up the code review process
- It helps with writing a release notes
- As mentioned: It helps with finding out a context of a given change
Commit message purpose is both documentation and communication and both are crucial to futureproof our projects.
How?
There are articles explaining basic principles of a good commit much better than I would ever do. I strongly recommend reading all of them, however if you are experienced with Git likely the last one is best suited for you:
- Writing a Good Git Commit Message from GitKraken - they explain the basics of commits really well so I recommend it for anyone new to Git.
- How to Write a Git Commit Message from cbeams - they did a good job describing the main rules we should follow in commit messages
- Git commit message written by Joel Parker Henderson - this one resonates with me the most he emphasis on structuring commit messages in your organization and using summary keywords.
Some of the rules you should simply follow. I will now focus on the most important topics from my point of view.
Atomic Commits
It’s important to keep the number of changes in a commit small as otherwise it’s difficult to write a meaningful commit message. If you’ve fixed two bugs and changed five files then commiting it all with a message like “Fix 2 bugs related to user authentication” isn’t a good idea.
After years it's difficult to find out the purpose of some of these commits.
It’d be better to split it into two commits like:
- “Correct redirection path of admin user authentication to /success”
- “Do not allow guest users to authenticate within admin portal”
It’s easier to give a good description of a simple thing:
for each desired change, make the change easy (warning: this may be hard), then make the easy change
— Kent Beck 🌻 (@KentBeck) September 25, 2012
In case of Git making the change easy usually is indeed easy as you just have to select the right files/lines to your commit(sorry for all command-line purists but in my opinion it’s the only Git task where GUI tools are much better than console).
There is one more benefit of small atomic commits - they are easy to revert and blame. In case your changes didn’t work you just use git revert for the commit. But if the commit contains multiple things and you don’t want to rollback everything - you are forced to do it manually.
I usually smell a problem when the commit title:
- goes above limit of characters
- is short but meaningless like in the example above
- is using word and meaning that we have multiple logical changes
Use commit descriptions
Every commit can have a description, it’s everything under the first line of commit message. In the description we aren’t so limited with the limit of characters so we should put there as much context as possible.
Tell others about the impact of the changes, if it’s related to a particular issue or ticket and put a reference to it. Think about the questions other might ask about your changes and try to answer them.
Use templates to setup commits structure in your organization
Every commit requires thinking “how should I describe it?”. Starting from zero always comes with additional cost. I prefer using templates to make writing commit message more procedural and less creative thing, following the template consumes much less energy which I’d prefer to spend on other things.
There is a second benefit of a good template: it could unify the structure of commit messages between all of your teammates. Assuming you will use a well structured template it should put everyone on the same page resulting in higher commit quality what also means better communication.
Personally, I’d recommend you using the commit template created by already mentioned Joel Parker Henderson as it’s descriptive and also provides helpful instructions for the writer.
The template is there only to help you so I’d be far from forcing everyone to use it. Maybe some people will neglect using it and will have their objections. Discussing what they dislike is a great opportunity for improvement.
Setup
Just create a .gitmessage file containing the template in any directory and provide the path to it within this command:
git config --global commit.template your_path/.gitmessage
It’s also possible to declare a different template for each repository, if you want to do so then skip the --global flag and put .gitmessage file inside the repository.
Dealing with conflicts
Everyone will face it at some point: a terrible conflict that seems to be impossible to resolve. It’s simply unavoidable on a bigger scale project. It’s easy to get lost in all of the changes.
But there is a solution that I’ve recently stumbled upon: the Git Sledgehammer.
Using this strategy you will have to resolve the conflicts iteratively for each commit. It’s not a magical solution as it still requires you to resolve all of the conflicts but there is one significant difference: it’s way easier to fight dozens of small enemies than one ultimate boss.
There are other interesting strategies in the mentioned post like imerge tool, but I prefer this one as it’s stupid simple and easy to understand, having it in the handbook will definitely come handy at some moment of your career.
Advertisment
Every organization would benefit from a fast and efficient pipeline. It makes your programmers happier by having more time, and being able to work on the things that matter.
I am a consultant and my passion is optimizing processes. I will do my best to bring value to your project. If you find my research and knowledge useful…
Hooks
Hooks are a way to fire custom scripts when you perform a Git action like creating a new commit. We could leverage it to perform a final round of checks ensuring that our code is high quality.
It will usually mean that we’ll run a static analysis tools on our codebase. To help you visualize how you could benefit from using hooks let me share the list of automations I’ve used in my recent project. If any of them will fail you won’t be able to commit until you fix the issue:
- Ensure there are no trailing whitespaces in the files
- Ensure that all line endings are using the same format
- Ensure that there are no merge conflicts in the files
- Check the syntax of all
.yamlfiles - Check for any warnings from automatic code formatter for both [back-end](https://github.com/rubocop/rubocop{:target=”_blank”} and front-end
- Run static analysis tool checking for security vulnerabilities
- Check for any Typescript warnings during compilation
You could put almost anything there, however, take into account that every action takes time and you have to wait until it’s finished before commit is created. If you are commiting small subset of changes often(as you should) then waiting XX seconds for every commit might be counter productive.
I’d avoid making the hooks too strict, I look on them as a tool helping me catch my small mistakes and [fail fast and early](https://www.martinfowler.com/ieeeSoftware/failFast.pdf{:target=”_blank”}.
If you are interested in setting up the hooks for your project I’d recommend you pre-commit. It’s a multi-language framework for commit hooks having hundreds of pre-defined hooks you could use out-of-the-box.
Aliases
The topic of aliases is somehow universal in terms of improving your performance while using CLI. Alias is supposed to save you keystrokes, no matter if it’s 2,3,4 or even 20 - any saved keystroke in a command that is repeated by you multiple times each day is a time saver. At the beginning saving one or two seconds might sound like nothing, but it truly sums up.
To add git aliases you might use command like:
git config --global alias.co checkout # enable `git co` instead of `git checkout`
or just go to your .gitconfig file which should be located in the user home folder(vim ~/.gitconfig) and edit the whole list:
[alias]
  st = status
  ci = commit
  cm = commit
  ce = commit --allow-empty
  br = branch
  co = checkout
  df = diff
  lg = log
  dif = diff
  psuh = push
  # I've also got some suggestions from ChatGPT, what do you think?
  last = log -1 HEAD
  uncommit = reset --soft HEAD~1
  today = git log --since=midnight
  amend = commit --amend
My favourites are st, br and lg as I incorporated them well into my everyday workflow, but you might find others useful.
Exercise: once you set up the aliases force yourself to always use them for at least one or two days. In the beginning, it is slower as you have to think to use the alias but once you get used to it you will use the shorter commands automatically.
Searching through Git history
Git comes with multiple tools to help us navigate through the repository history. Log and Blame are likely familiar to you, but there is also Bisect tool. Every has a little bit different purpose and I will try to explain when and why use a given tool.
Git Log
I guess it’s the most common command after commit and branch. It displays a linear history for our repository. There is a variety of options we could use with our log command like:
--authorto filter the output to only show commits by a specific author--grepto filter the output based on a search term--onelineto display the commits in a more condensed format--graphto show the commit history as a graph-n 3to show only the last three commits--afteror--beforeto filter the output by dates-pto display all of the file changes in commits--compact-summaryto display a list of files modified by each commit
Usecases
-
Looking for something:
I deliberately used the word something as I usually the
logwhile I am not yet sure what I am looking for. Usually--grepoption with a specific keyword is my biggest ally. It’s a great starting point to learn the history of a specific feature.For a history of a specific file it’s better to use
blameand to find a commit which introduced a bug it’s better to usebisect. -
Understanding how the repository evolved over time:
We talked about aliases already but when we talk about inspecting history I’ve found a great bunch of aliases shared by Slipp D. Thompson:
[alias]
 lg1 = lg1-specific --all
 lg2 = lg2-specific --all
 lg3 = lg3-specific --all

 lg1-specific = log --graph --abbrev-commit --decorate --format=format:'%C(bold blue)%h%C(reset) - %C(bold green)(%ar)%C(reset) %C(white)%s%C(reset) %C(dim white)- %an%C(reset)%C(auto)%d%C(reset)'
 lg2-specific = log --graph --abbrev-commit --decorate --format=format:'%C(bold blue)%h%C(reset) - %C(bold cyan)%aD%C(reset) %C(bold green)(%ar)%C(reset)%C(auto)%d%C(reset)%n''          %C(white)%s%C(reset) %C(dim white)- %an%C(reset)'
 lg3-specific = log --graph --abbrev-commit --decorate --format=format:'%C(bold blue)%h%C(reset) - %C(bold cyan)%aD%C(reset) %C(bold green)(%ar)%C(reset) %C(bold cyan)(committed: %cD)%C(reset) %C(auto)%d%C(reset)%n''          %C(white)%s%C(reset)%n''          %C(dim white)- %an <%ae> %C(reset) %C(dim white)(committer: %cn <%ce>)%C(reset)'
Using the
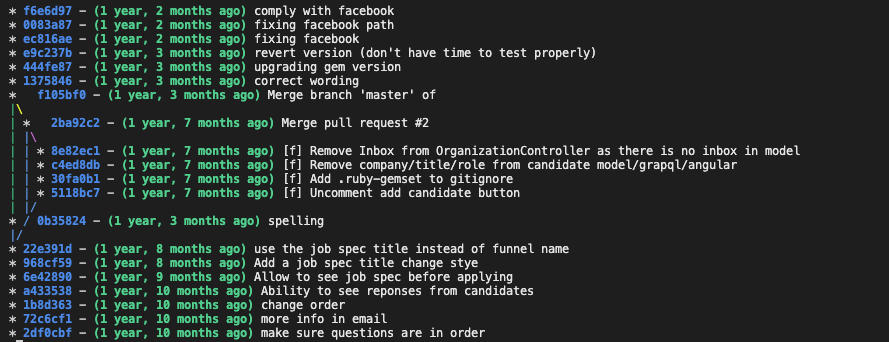
git lg1and others will display a nicely formatted graph history of commits in your repository. Useful to get a broader perspective of the history of the project you are working on.
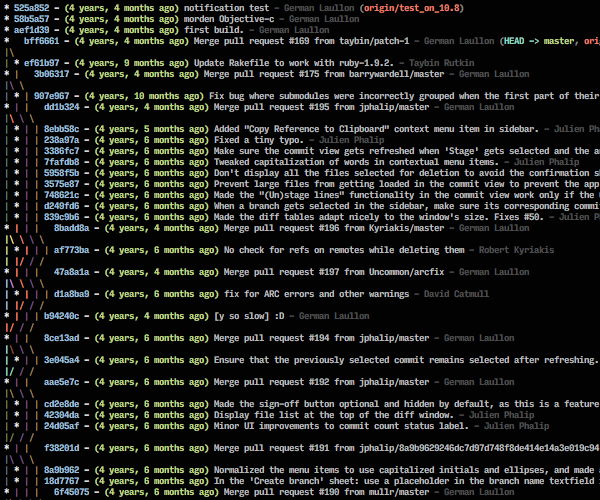
Example of git lg1 command, lg2 and lg3 display more details.
Git Blame
Git blame is a command in Git that allows you to view the commit history for a specific file. When you run git blame, Git will display the commit hash, author, and commit message for each line in the file, along with the line number. This can be useful for tracking down when a particular change was made, or for understanding the history of a file.
For example, you might use git blame if you want to find out who wrote a particular line of code, or if you want to understand why a particular change was made. You can also use git blame to see when a particular line of code was last modified, which can be helpful for understanding how a file has evolved over time.
To use git blame, you can run the command followed by the name of the file you want to view the commit history for. You can also use options like -L to specify a range of lines, or -M to follow renames in the file’s history.
Git Bisect
Bisect allows you to find a specific commit in your repository’s history that introduced a bug. It uses a binary search algorithm to achieve that.
Difference between Blame and Bisect
Shaumik Daityari clarified it exceptionally well for me in his Debugging with Git article:
Git’s
blamecommand is helpful when you are aware of the file which introduced the change. Imagine a scenario where you can see the effect of a bug but aren’t sure which part of the code leads to it! In such cases, Git bisect comes to the rescue.
How it works?
You have to tell bisect about an old commit that you know is a “good” one, then you specify a “bad” commit from the future. It will then automatically checkout the commit in the middle of the good and bad commits and ask you whether the code is good or bad. Based on your response, bisect will either move to the next commit in the search or mark the current commit as the one that introduced the bug.
You should always write a test assuring that the problem you are looking for indeed didn’t exist in the “good” initial version and has been introduced by the “bad” commit. Bisect already knows that tests are awesome and let us specify a command to decide if the commit is good or bad:
git bisect run [command to run tests]
Writing a test showing that there is a problem in a code and then fixing the code to make the test pass is the right thing to do because:
- You add coverage for a border case scenario that wasn’t checked by tests earlier
- You are making sure you won’t get regressions for a similar issue
Use blame-ignore-revs for bulk changes
It’s quite common that in the early days of projects every developer uses their own coding style. Then at some moment, someone decides to enforce the same styling guide across all parts of the system. It’s easy to accomplish it as all programming languages have their own tool to re-format the files in a certain way.
Although it’s a great idea to do the cleanup, it leaves us with possibly thousands of changes. It’s a common practice to add all of these changes in bulk to one commit. There is one problem: doing so completely messes up the output of git blame. Also, someone might think that the author of the bulk commit is also responsible for the changed code which might be completely untrue.
There is a quick fix for this problem, it’s putting the .git-blame-ignore-revs file within your repository. Inside this file, you have to enter the commit hash that you’d like to ignore. Blame will automatically skip the commit(learn more about ignoring revs there).
You made it to the end, thank you!
Recent posts:
Taking notes for productivity - Effective Programmer pt. 1
Organizing knowledge is a key factor of effective programming work. Is taking notes the perfect way to do it? I think yes answering all of the why and how questions.
Read More
How to deploy multiple Rails apps on a single server with Capistrano
Almost everyone uses cloud hosting solutions like Heroku or AWS nowadays(and I don’t expect it to change even after this DHH post). But if you still self-host your apps then Capistrano would be well known to you.
Read More
Taking notes for productivity - Effective Programmer pt. 1
How to deploy multiple Rails apps on a single server with Capistrano
Almost everyone uses cloud hosting solutions like Heroku or AWS nowadays(and I don’t expect it to change even after this DHH post). But if you still self-host your apps then Capistrano would be well known to you.